Showing posts with label Deadzone. Show all posts

Wednesday, 1 July 2015

Deadzone - Battlezones #2

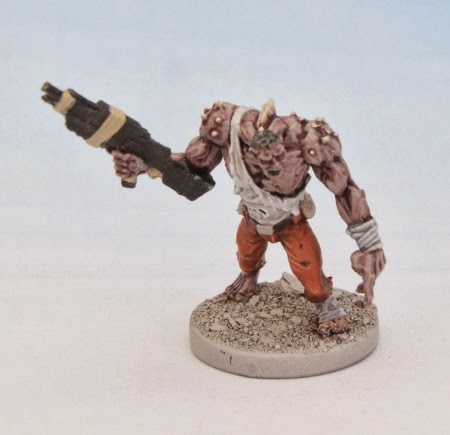
Things have been a bit quiet here recently; as mentioned previously holidays and real life have kept me from painting much. I've now added buying a house to the mix so things may well be a bit intermittent for the next few months, although I will try my best to stay regular.

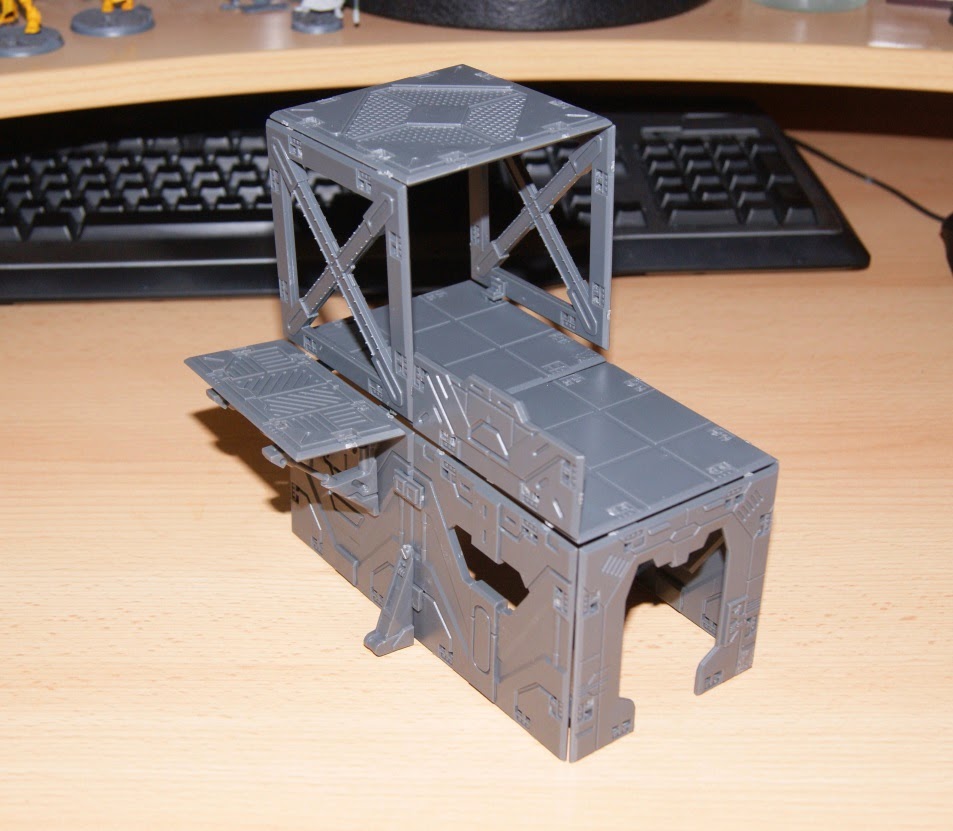
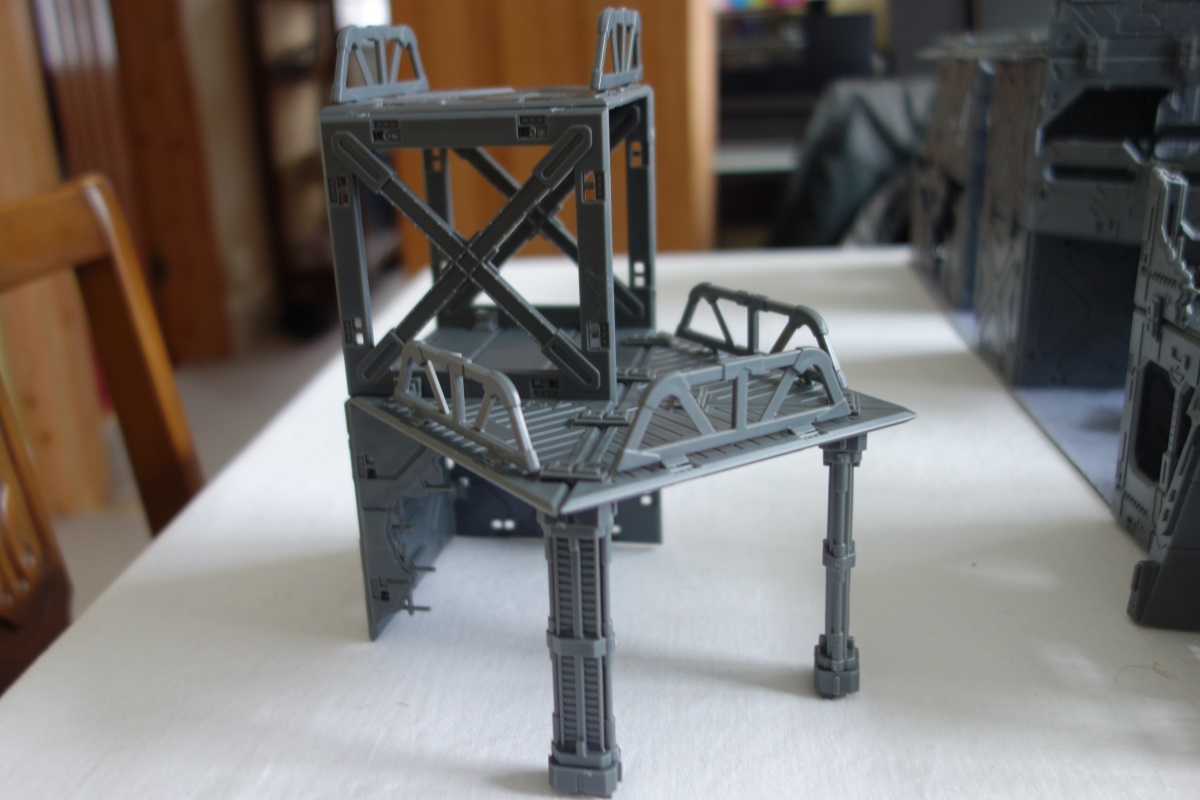
Last weekend was another meet up with Rictus and Maelstrom, as such I managed absolutely zero painting. I did however spend a good few evenings putting together some of the Mantic Battlezone scenery for the few games of Deadzone we played over the weekend.
The modular nature of the scenery makes it quite puzzle like in assembling, and the nature of the clips mean that after an hour or so you are likely to have sore thumbs, but the end result is definitely worth it.

I'm not actually sure how many packs of scenery I own; most of it comes from funds allocated when I did the Mars Attacks Kickstarter, but I have since bought quite a few spare ruin sprues, the Contagion set and at least one other large terrain box (the sci-fi ruined sector I think). It is worth saying that there were still a lot of parts unused (mostly from the bunker set as it didn't fit the aesthetic I was going for).

Below are some shots some of the individual pieces.


Finally here are a few shots of the battlefield itself. All of this was held together using just the clips, at this stage I haven't used any glue.


Sunday, 21 December 2014

Deadzone - Plague Stage 1 & 2 - WIP #2

I managed to contract some form of stomach bug last Sunday, so what little time that wasn't spent in bed was filled with otherwise essential functions that meant I couldn't manage to put up a blog post (or do much of anything else for that matter).

In the last week or so I have been working more on the Deadzone Plague, adding more depth to the armour plates on the Stage 1A and Stage 2 models, blending the armour into the flesh tones and starting to add detail to the faces. Still a lot to do but they are starting to really come together now.

This was achieved by thinning various mixes of Khorne Red, Naggaroth Night, Rhinox Hide and Rakarth Flesh and then painting this into the recesses.

I also used this mix as a glaze for the purple flesh areas, using various different glazes in between smaller edge highlights of Rakarth Flesh.

Below are two shots of  the 1A. The 2A's look pretty much the same so I didn't feel it necessary to add up an WIP's bar the shot of the 2A leaping over the barricade. This was added to show the drybrushing done to the bottom of the barricade. This was done as I was doing the highlights on the base using my standard basing mix.


Sunday, 31 August 2014

Deadzone - Plague Stage 1 & 2 - WIP #1

Not so much progress on the Space Wolves this week, I now have 5 Terminators painted to the standard seen in the previous post. In my mind this doesn't translate as a blog worthy update however.

Likewise I have 8 new Grey Hunter models assembled, but unfortunately lacked the opportunity to photograph them in time for the post today.

Instead I've got some WIP photo's of the Stage 1 & 2 Plague from Deadzone.

The armour is a basecoat of Usbanti Bone followed by a wash of Agrax Earthshade.

These have then been drybrushed using various levels of Ushbanti bone mixed with Ceramite White, with glazes of Carroburg Crimson painted into the deepest recesses. The idea being to create fleshy areas in the deeper parts of the armour plates


I'm off on holiday for the next couple of weeks, however I might find time for a couple of small posts.

Sunday, 23 March 2014

Deadzone - Plague - WIP #4

More Plague again this week. Heaven forbid I might actually finish some models for once! That being said, I have spent most of today working on Eldar and some Deadzone Equipment Crates for a change of scene.

Nevertheless, the Stage 3A Plague are all but done now, with just a few little details left to go (predominately, eye's, nails and some blood splatter).

So one final WIP for these guys and then onto the remaining Stage 3B, Stage 2 & Stage 1.

 Stage 3A 'General'
 
 Stage 3A with HMG


Stage 3A Troops
 
 
With the above nearing completion I've spent a bit of time prepping the next two models, the Stage 3B Plague Hounds. I started with the same base coat mix for the flesh, then applied the same ink coat. On top of this I've glazed a bit of brown and black. At the moment I'm sort of just playing with the tones to find something that feels a bit more hound-like whilst retaining the Plague appearance.
 
Stage 3B Plague Hounds

Finally I spent an evening this week doing a test for the Deadzone scenery. One of the Stage 2 is posed leaping over a barricade, and I figured this was an ideal test for trying out a colour scheme.

I used a basecoat of Vallejo Model Air (VMA) Dark Blue Grey. This was given a wash of thinned GW Abbadon Black. Over this I layered on some VMA Dark Seagreen. I added GW Rakarth flesh to the Dark Seagreen for a couple of highlights with a final highlight of Rakarth Flesh. The yellow is GW Averland Sunset over which I layered Some GW Yriel Yellow. Battle damage was applied with a sponge using Dark Seagreen.

Stage 2 Base - 'Scenery Test'


Sunday, 16 March 2014

Deadzone - Plague WIP #3

Continuing on from last week then with more work on the Plague. I've finished work on the skin (for now) and as you will see from the pictures below worked on the clothing areas as well. I went for white vests to allow for a good contrast with the purple of the skin. To different the standard Plague troops from the HMG and "General" figures I chose two different colours as seen below (orange and blue).
 Stage 3A "General"
 
 Stage 3A Specialist with HMG


Stage 3A Troops

I've tried for a slightly cartoony finish as it seems to fit the sculpts really well.

With the spines I wanted to make it look like the skin had split apart as they grew out so used Carroburg Crimson as a shade for the bone colour, adding several layers before highlighting up (simply adding White Scar to the Ushabti bone base colour).


I've already carried on working on these guys, with the bases now painted. I've also airbrushed a bone colour onto the Stage 2 & 3 models in preparation for getting them started.


Sunday, 9 March 2014

Deadzone - Plague WIP #2

So after the disappointing results from last week I went back to the drawing board. In this case it meant surfing the web for some inspiration and revisiting the Plague skin. I definitely wanted to keep it to an unhealthy pallor, and finally came across a blog with a skin tone that was close to what I was trying to achieve.

After a minor tweak I went to work. Pictures below.


The skin is a basecoat of Rakarth Flesh. This was then shaded with a 1:1 mix of Druchii Violet and Agrax Earthshade. Before having the Rakarth Flesh reset and highlighted with a 1:1 mix of Rakarth Flesh and White Scar (white).

The plan is to do several highlight stages with the last mix, with a light glaze between each highlight stage (a 1:1 mix of the shade tone and glaze medium to keep it thin and not too shiny).

Much happier with the results.

Hopefully the Stage 3 will be finished in the next week or so. After that for the Plague will be the Stage 1 & 2 models.

Sunday, 2 March 2014

Deadzone - Plague WIP #1

So that last week or so I've been assembling the Plague from the Deadzone box. Today I finally managed to put a lick of paint on said Plague and attempt a slightly different colour scheme.

I'm not especially taken with this first attempt so will most likely look around for a slightly more colourful scheme, but I did use the opportunity to play with using an airbrush to provide some rudimentary light and shade prior to laying down the paint. The idea being that a few thin layers of paint would allow for a minor variation in tone that I could then use to block in some stronger shading.

Unfortunately I have a bit of a blind spot for painting lighter 'non-human' flesh and the shading is a bit weak. So back to the drawing board I think.

 
Test Scheme #1

Sunday, 23 February 2014

Deadzone - Battlezones #1

This week just a brief update looking at the scenery in Deadzone. Following on from last weeks effort I have spent some time cleaning up the various Deadzone sprues and having a go at putting some buildings together.

Things I have noted:
  • If you want a truly solid structure and use connectors in every slot, you'll run out of connectors and still have several scenery tiles left.
  • You don't actually need to do the above.
  • You do need to file down the connector clips and the holes in which they fit.
  • Likewise you'll want to ensure all the tiles have had a thorough tidy up with a file and knife.
  • Don't try and force any tight connectors out of the sockets. You will break some. The perfect tool to use would be another connector (which if like me, you have a broken one laying around, perfect tool sorted).
All in all the scenery requires preparation but is solid and actually really good fun to work with - I've included some sample structures below.

Note: These structures use all the connectors, I still have 5 odd tiles left (and lots of the accessories still on sprues).


Sunday, 16 February 2014

Containment Protocol - Deadzone #1

It's all Maelstroms fault. Having managed to wilfully hold back from the kickstarter I finally succumbed to purchasing the game after he bought an Enforcer Starter Pack to the meetup. A scant two weeks later and this arrived:

Found on eBay for £53.00 with free delivery.  Though can be found cheaper now.

There are plenty of unboxing video's and blog posts out there already so I won't go into to greater detail beyond saying that the components look to be of very good quality, and the majority of the models included don't seem to suffer too badly from flash (which is the big bane of sprueless plastic/restic at the moment). As the box was of the pre-release variety it did include the Survivor Mecenary in metal. I  prefer this pose to the kickstarter exclusive plastic one. Unfortunately I am missing the missile launcher arms (and launcher) from the Enforcer set, so I am currently waiting for a response from Mantic to see about getting that sorted.

Survivor Mercenary

Aside from the game itself a big boon is the terrain. Touted as a modular solution which easily snaps together and comes apart it has great potential for portability and variety from very few sets. Unfortunately commentary from around the web has indicated that there are some issues with using the connectors, and their ease of fitting into the holes.

This seems to stem from mould line within the holes. On one of Mantic's videos they state that simply filing this mould line down will help alleviate the problem. Needless to say I did have a quick go at it and produced the following in about 30 minutes or so.

Quick assembly out the box

To be honest it needs a lot more work, the tiles themselves need to have the bits where they've been detached from the sprue filed down. But a quick file through the holes, and on some of the connector tabs and some of the connectors have popped in very easily. Over the next few weeks I'll endeavour to clean and see how things progress.

The more observant will notice, in the background, some Wraithguard which are getting some further basecoat action as well. More on these another time.