Showing posts with label Eldar. Show all posts

Monday, 3 August 2015

Eldar - Iyanden - Wraithlord WIP #3

So the house moving has now toddled along at full steam for a few weeks and now the bulk of all the hard work is (hopefully) done and baring one final insurance hunt I can sit back and take a breather. I have managed to get some painting done however, but organising this into a coherent blog post has proved elusive.
Now I have been bitten by the Age of Sigmar bug (more on that next time), but before I started down that route I chose to re-visit my Iyanden Eldar Wraithlord to see if I can tighten up the paintwork.

The original scheme only had Cassandora Yellow as the shade. This is fine for the most part (and by applying as a wash added some nice shading to the armour panels) but I felt the model needed a bit more contrast. I thinned some Doombull brown with Lahmian Medium and carefully painted into the recesses. Edges were redone with Dorn Yellow with small areas of White Scar added at the corners and other sharp points.

The blue has also been re-done. Originally I tried to wet-blend the highlights but ended up with an effect that was far from smooth. I used a little bit of sandpaper to smooth out the roughness and worked the blue up again from Kantor Blue adding Fenrisian Grey to make highlights. I gave the blue a few glazes of Guilliman Blue before trying out the new Forgeworld Calth Blue.

Now the FW paints are designed for an airbrush so I was curious to see what would happen if brushed on. So far, well, it's a little streaky for my liking but warrants further investigation. It did give a nice tone though.

The sword has been re-blended from a base of Dechala Lilac (over a white undercoat) down through Genestealer & Xereus Purple and Naggaroth night. It has then had several thinned glazes of Vallejo Purple Ink to give it some extra shine. I found this a vast improvement over my original attempt which started out with a Genestealer purple base and attempts to blend both ways.


The picture below shows the Wraithlord as it stands now. You can see the areas that have recieved the update to the paint scheme so far. The shot below really shows the difference it has made to the model. The black, yellow and purple areas that have been completed are of a standard I am happy with, and you can see the added contrast that they now have. The blue still requires some thought though (and maybe the aid of the airbrush if I try the Calth Blue again).


The Wraithlord has been put away again, as Age of Sigmar has taken my painting focus for much of the last fortnight. This is due to actually getting games in locally and an agreement with my opponent that (having played our first game) we will now only play with painted models. It is quite the incentive...

Sunday, 6 April 2014

Eldar - Iyanden - Wraithlord WIP #2

Just a quick update this week, showing further progress on the Wraithlord. (I have been working some fine details on the Plague, but they still need finishing off.)

Black on the torso has been highlighted (not the weapons though), although I am tempted to redo (a lot of this model is turning out to be a way to figure out how to do the army as a whole). My focus over the last couple of evenings has been the Ghost Glaive.

I chose purple as it complements the yellow perfectly. Still working out the blends but so far so good.
In order to get smooth transitions I blocked in the lightest shade where necessary and worked the blends into it as I went (you can see an example of one of these blocks pre-blended in the photo below).

Wraithlord WIP #3


Once it is complete I'll give a rundown of the colours used.

Sunday, 30 March 2014

Eldar - Wraithlord WIP #1

So today I am at the Forge World Open Day, but in true Blue Peter fashion, here's one I prepared earlier...

This week I am back on the Eldar having spent a month or two distracted by Deadzone. Needing to take a break and do something different I figured it a good opportunity to base coat the Eldar that still needed doing, before moving on to assembling the remaining models.

With work still to do on one of the Seers it turned out that only the Wraithlord and a single Spiritseer to do. Of course I then got carried away and had to get the the yellow highlighted and other colours blocked in as well.

As such this is the Wraithlord as it stands.


Wraithlord WIP #1

The Black has only been blocked in at this point, but here's a guide to the other colours so far:

Yellow

Without the airbrush, I think this would have been an absolute nightmare! I base coated with Averland Sunset initially to use it as a solid base to build from, but also to provide a little shadow for the Yriel Yellow layer - which I sprayed from a more top down angle, covering most of the model but leaving Averland in the most shadowy areas (under the loincloth for example).
  • Undercoat: White
  • Airbrush Layer: Averland Sunset
  • Airbrush Layer: Yriel Yellow
  • Wash: Cassandora Yellow
  • Airbrush: Yriel Yellow (top down, at about a 45 degree angle)
  • Edge: Flash Gitz Yellow
  • Edge: Dorn Yellow
  • Glaze: LamentersYellow
  • Edge: Dorn Yellow (on the sharpest points)

White

Basically done using multiple layers of wet blending transitioning between the four different colours on the palette. It's not the smoothest blend, but I am still learning so I'll cut myself some slack.
  • Basecoat: Astronican Grey 1:1 White Scar
  • Highlight: White Scar
  • Shading: The Fang

Blue

The blue I wanted to keep dark and rich. Again using a mix of wet blending and edge highlighting to achieve a bit of depth.
  • Basecoat Abbadon Black 1:1 Kantor Blue
  • Wetblend: Kantor Blue
  • Wetblend: Kantor Blue 1:1 Alaitoc Blue
  • Edge: Alaitoc Blue 1:1 Blue Horror
  • Glaze: Guilliman Blue


Sunday, 2 February 2014

Eldar - 1000pt Zone Mortalis Force

This weekend I am up at Rictus's place partaking in a few games of Zombicide, Dreadball, Sedition Wars and of course 40K. Tomorrow I should be heading up to Warhammer World, where I will be persuaded to buy something Forgeworld (being that I am tempted by an Avatar and a Wraithseer).

Obviously this means that I wouldn't have had time to write this update on the day, but through the 'miracle' of the modern age and technology I am sat here on a Tuesday evening happily writing Sunday's post (and hoping that nothing untoward happens in the intervening time, otherwise I'll have to rewrite that whole introduction...)

This week I'll spill the beans on the contents of my army. My intent for this weekend was to have all models usable with all their relevant bits and bobs attached with only the normal dangers of a weak glue bond from stopping a model from falling apart (rather than copious amounts of blu-tack!) This did mean that a certain amount of paint would be necessary so that I didn't struggle later on down the line when I came to paint everything up to a standard I'll be happy with.

This meant basecoats galore, so both Wraith units have had the yellow added and the Dire Avengers their signature blue. I also painted the crests yellow and blocked in the black and white of the helmets. Unfortanately that was all I had time for, so the Wraithlord and Spiritseers remain untouched (also why I have yet to trim the pins of the apparently 'floating' Wraithlord).

Here's the offending units. The army list is based around the Iyanden supplement. I wonder how well they'll do...

 Striking Scorpions with Exarch (and Scorpion Claw)
 
 
 Spiritseers - one with the Spear of Teuthlas, the other with an oversized head.
 
 
 Wraithguard with Wraithcannons
 
 
 Wraithguard with D-Scythes
 
 
 Dire Avengers (with Exarch wielding a Shimmershield & Power Weapon)
 
 
Wraithlord (and Warlord) with Star Cannon, Scatterlaser and Ghost Glaive

Sunday, 26 January 2014

Eldar - Spiritseers WIP #1

Slightly out of sync with my planned post schedule alternating between Eldar and Dark Eldar, the next couple of weeks will be dedicated to the building of the Eldar for my meet up with Rictus and Maelstrom.

The last week has been spent finalising the building of the army, which I am pleased to say is now all but finished. All models are built, and some have even had a lick of paint on them in order to make it easier to finish them all off at a later date.

Todays post focuses on the HQ for the army.

---

For this army I needed two Spiritseers. I'm not a big fan of the finecast seer it has to be said, so I thought I'd do a little bit of basic conversion work. I picked up a finecast seer and the plastic Farseer to be the bases for the two Seers.

The plastic one simply had the finecast seer head added to it and a Wraithblade crest added to his back. Job done. (The head is on a long pin so it can be removed and the farseer head added to it depending on which model I need to fit in the army).

The finecast seer has had a bit more of an extensive job done on it. Firstly I cut off the staff and drilled out the right hand. The idea being that it looks like he is doing something psykerish. The staff has then been added to a Dark Eldar pike and attached to the right arm (having removed the hand clutching the gem in a "rock-on" grip). I'm toying with what to use for the head, either the bare Eldar one he has at the moment or maybe greenstuffing up a Dark Eldar Reaver head to match the original one that came with the model.


Next week I am at the meet up, but time allowing I will update with a post with some shots of the units I am using.

Sunday, 19 January 2014

Eldar - Striking Scorpions WIP #3

 
As briefly mentioned last week, most of the last few weeks  has been spent assembling enough Eldar for a 1000pt army at the fast approaching meet up with Maelstrom & Rictus at the end of the month. Rather than just glue everything together and worry about the painting later I have been attempting to get the largest basecoat area done with an airbrush, much as I did with the Scorpions originally. 
 
I've also been working to get the bases modelled up and painted, this way I don't have to contend with models falling off of bases when the blu-tack isn't strong enough. If it helps save me from (somewhat justified,) ridicule regarding models with no weapons or backpacks then that is just a bonus as far as I am concerned.
 
Needless to say all this has limited the progress on the Scorpions, but they are still moving along at a reasonable rate. At this point the main metallic area & any gems have been done. Pictures below.


At this stage I am looking to keep the faceplates white as it will help tie the Scorpions back to the Iyanden theme I am working on - any non-wraith models will have a white faceplate.

Sunday, 5 January 2014

Striking Scorpions WIP #2


So after a short Christmas break it's back to the painting 'grindstone' as it were. As previously stated I've not had a lot of time to dedicated to painting over the last few weeks but I have managed to finish the blue and lay down the black base for the remaining colours. I also applied a Waywatcher Green glaze to the armour which has helped to enrich the colour a little bit.

The blue took a while to get right colour wise, although I am not overly happy with the quality of the paint job, so I may revisit it once I have finished the army.


Blue has been painted as follows:

Base: Abbadon Black 1:1 Kantor Blue
Wash: Drakenhof Nightshade
Layer: Regal Blue
Layer: Alaitoc Blue
Edge: Lothern Blue
Glaze: Guilliman Blue

I used the blue areas as another opportunity to practice wet blending on. The result is so-so in my opinion, and perhaps the area is too small to use the technique effectively, but I figure it teaches good brush control so is worth persevering with.

Sunday, 15 December 2013

Eldar - Striking Scorpions WIP #1

As promised this weekend, here are the first of the Eldar models. I've always been a fan of Striking Scorpions so there was no way I was going to miss out on including a squad in the Eldar army (that and I had a box of them kicking around from a few years back).


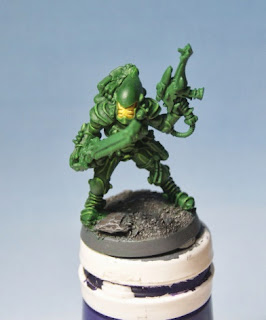
Armour Painted Green - at this point I started to experiment with wet blending on the helmet and will attempt to improve and continue the technique on the hair  and any other larger areas of the models.


Test of a Yellow Faceplate - I'm not sure what colour to do the faceplates, and have been actively encouraged to do a yellow one (due to it being a more traditional choice of colour) so I've tried it out on one of the guys. At this stage I'm not convinced, but will need to see it on a more complete model before making a decision.


Paints used for armour - as I was doing a small squad I stuck with the older GW range. The dropper bottles contain glaze medium & water and the larger bottle at the back is matt medium. This was used in various quantities to allow me to airbrush the models green. The photo below shows the models after the airbrush stage - First airbrush was with Dark Angels Green, after which a coat of Snot Green was Airbrushed onto the models.

 
Following the airbrush coats the models were washed with a 1:1 mix of Abaddon Black & Dark Angels Green (with glaze & matt mediums added to help consistency & water added to thin.)
 
Highlights were three stage:
 
1) Snot Green
2) Snot Green 1:1 Scorpion Green
3) Scorpion Green
 
I had all three mixes on the go at once (I also had DA Green and the wash mix on the palette). I then worked each area until it was fully highlighted. In most cases this was simple edge highlighting but as mentioned the helmets were wet blended which makes for a much smoother transition.